Friday, September 30, 2011

Filling out the Form

View from the inside.
With the last arch in place, the crew starts back at the beginning and inserts any missing bolts and tightening everything down. It's amazing to see how the simple act of tightening bolts brings all the arches in line and smooths out the form.

View from the south end.

Working toward completion, we received delivery of our insulation panels and were able to stack them inside the structure. That kept them from melting in the noonday Florida sun.

The stretch bars (see on the side) are a critical part of the equation. Proper application (READ THE INSTRUCTIONS) keeps everything lined up so that one side of the building isn’t a foot-and-a-half longer than the other when you get to the end! 


There’s a line of stretch bars on the top also, but to elaborate would seem redundant.
Allowing for monsoons, and breaking midday for a few hours to avoid being vaporized by the Florida sun, we completed our mission in just six days.

Thursday, September 8, 2011

Up she goes!

Bundles of corrugated steel and buckets of bolts, a building make.
Weatherstripping on all joints keeps the water out.
Okay, kiddies, this is what a 40-foot by 50-foot Quonset hut looks like before you add water. Alright, so you don’t add water…just a few thousand bolts… and a few miles of weather-proofing tape doesn’t hurt, either.


A heavy-duty impact drill makes this step fast and easy.


Before the arches go up, the base plates must be anchored. After careful measuring, we drilled half-inch holes about 8 inches deep with a an impact drill. The anchors are half-inch by six-inch Red Head concrete anchors. They work great and can be reasonably purchased from any fastener supply dealer.


As they say: “A journey of a thousand miles begins with one step, and a Quonset hut begins with one arch”. Okay, I added that part about the Quonset hut...and it’s only partially true. A Quonset hut actually begins by bolting two sections together but the most important part of that step is identifying which two sections belong to each other.  


Keep plenty of drill batteries on hand and powered up.
To do this, it helps to have at least one member of the crew who can not only read, but has the proper motivation to do so.  They give you written instructions for a reason: to help you figure out where you screwed up after you realize the knowledge of proper Quonset hut building is NOT in your DNA!
Regardless which method and equipment you choose to raise your first arch, it is the most challenging one to put in place.
This view shows how flexible a single arch is. 
After employing the alternative strategy, I strongly urge you to READ THE INSTRUCTIONS FIRST!
Oh, another thing; Never underestimate the flexibility of a Quonset arch. The more hands you have, the better (and safer) the process will be. We thought we had what it took to get the first arch up, and we did…but my life flashed before my eyes three times before it was securely perched on the scaffold jacks. After putting our first arch up in one piece, we wisely decided to do the rest in half sections and I had no more ’life-flashes’.
Half sections were much easier to work with. This photo shows us with three-and-a-half arches up.
As you can see, things went fairly smoothly from this point, and as each arch wormed its way into place, they actually seemed to get easier. 

Friday, July 22, 2011

Finalizing the Slab Forms

The following pictures show the final stages of completing the slab and footing forms. This step includes utility stub-ups, placement of reinforcing bars (rebar), welded wire mesh, and the foam inserts used to form the cistern gutters.

Mrs. Q checks the stub-ups and moisture barrier.

The crew assembles the cistern gutter form.

 A footing corner showing the cistern gutter form, rebar, and geo-tube


A side benefit of the Quonset's construction is its highly efficient precipitation run-off. The galvalume metal finish is very smooth and since the roof and walls are a continuous corrugated plane, all of the moisture that falls on the building is directed quickly to the gutters which drain into the cistern. In areas where snow is a possibility, heavier live-load specifications are required.

If it snows here, we're moving to Cuba!

The concrete trucks arrive early and the action begins. Concrete was pumped into place in parts of the slab because the trucks couldn't get into a position to pour.
The morning sun greets the cement trucks.
The cistern gutters begin to take shape.

A cement finisher forms a slope to the drain.
Cement begins to harden within a half hour, so the men work fast to get everything in place.

Using the long trowel pole, a finisher works the concrete.
Seven truck loads of cement later, the slab is formed and takes on a smooth finish. Finish troweling burnishes any imperfections and after a couple of days of curing, stress grooves will be cut to minimize cracking. Our contractor assured us, however, that concrete cracks, but with all these precautions they should be minor hairlines. Within three to four days, we'll be ready for the Quonset shell to be erected!

Sunday, July 17, 2011

Beginning to take shape

More compact-able base is added

7/14 - Slab pads are basically complete, geo-thermal tubes are in place, and the concrete forms are under construction.


From the driveway
From this perspective the placement and size of the carport structure are materializing but it seems smaller that the actual 40' x 50' dimensions might imply.
The exhaust end of the geo-tubing extends above the slab surface
The intake end of the geo-tubing just outside the Quonset's skin will be attached by brackets and will rise to about seven feet
The four, 100-foot long, geo-thermal tube coils are buried about seven feet in the ground and will be more than eight feet deep after the slab is poured. We project this will preserve our estimated 70-degree F soil temperature and help cool (or warm) all incoming fresh air. If our plan works the way we intend it, there will be no grid energy required to heat, cool, or circulate the air inside the structure for at least nine months of the year. If the plan doesn't work, we just buried about six hundred dollars worth of plastic pipe that will confuse the heck out of a team of archeologists a thousand years from now.

To give you a better idea of our overall plan, This sketch shows how the buildings will be positioned in relation to each other and to major features.

For those that might question the placement of the septic tank relative to the pond and cistern, our soil is so sandy, percolation is fast and straight down, and the drain field extends north, well away from any chance of contamination.

The pond will be lined with a rubber liner to prevent the pond water from being absorbed by the soil. From the pond bottom at eight feet of depth, we are only ten feet above the ground water table.

A tropical downpour
The misty haze is a heavy downpour that lasted almost an hour, and as you can see, there is no puddling on the ground. Frequent rains over the past couple of weeks have slowed our progress by a day or so, but the rain is much-needed and we can deal with the delays. Things have been going well otherwise so we're still on schedule. The slab will be poured next Friday. The building will be delivered by the 23rd and we plan to put it up over the July 30-31 weekend. Be sure to watch the step-by-step assembly and erection of the Quonset arches. We've invited a bunch of friends to help and we plan to video the action. This is going to be fun!


Sunday, July 10, 2011

Beware of Levitating Cisterns

 Word to the wise!


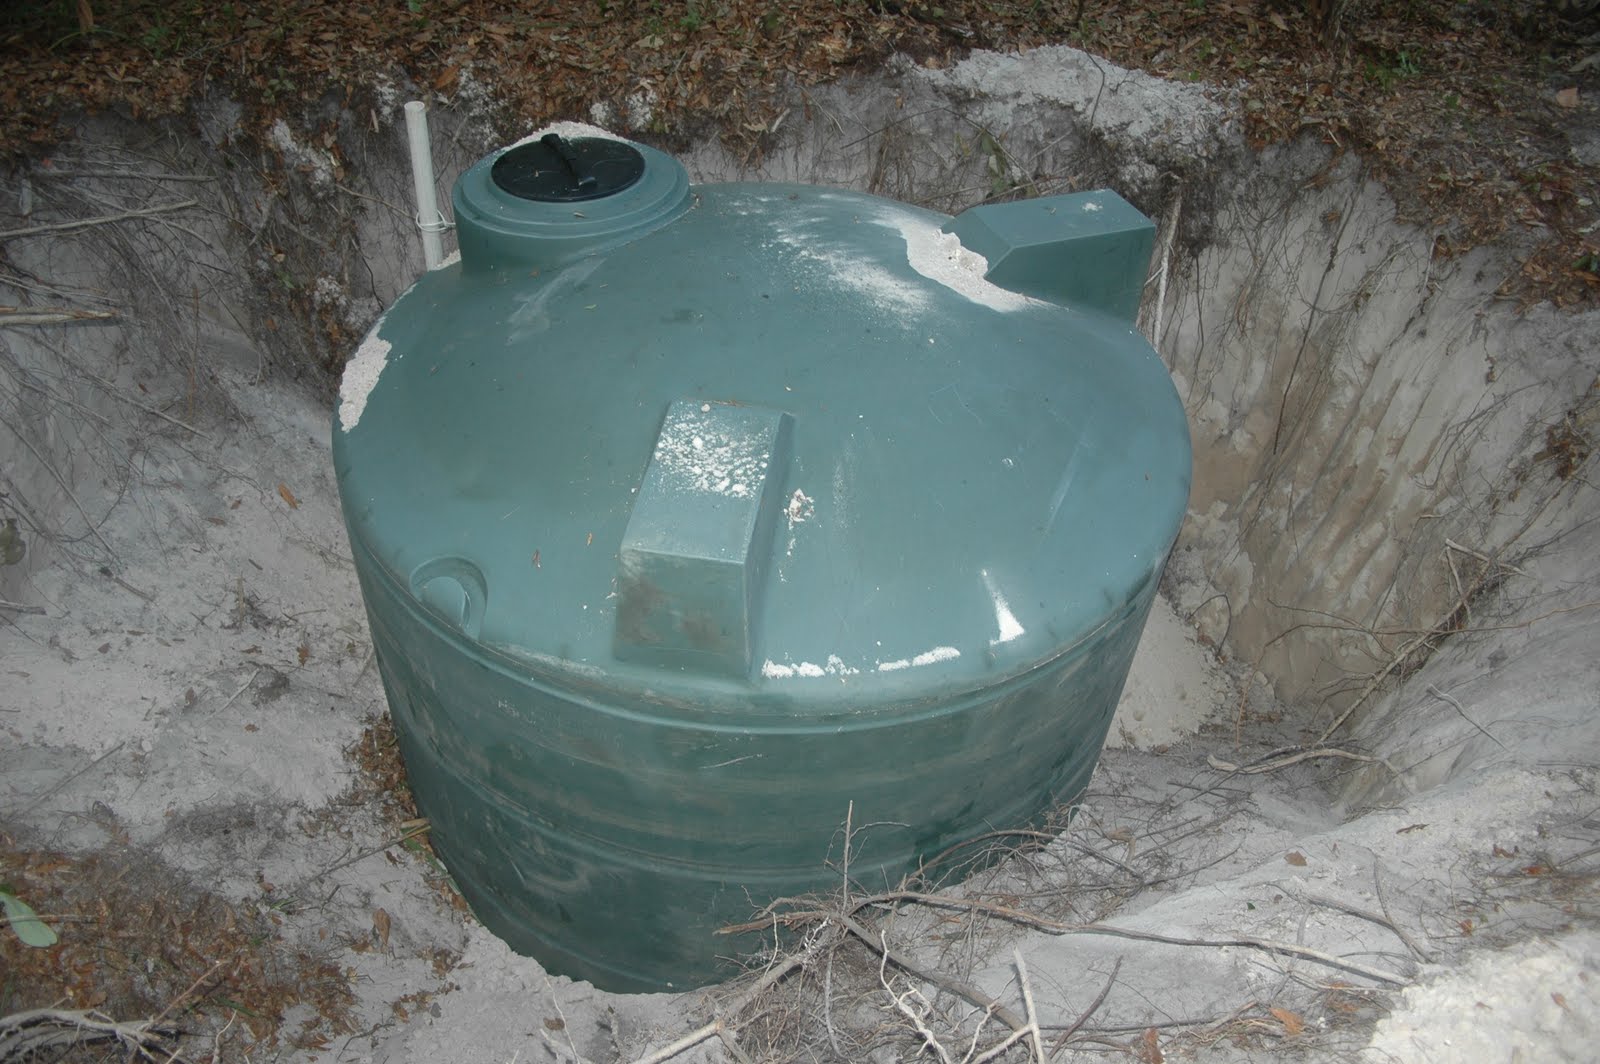
This is what a cistern looks like when it is properly planted in the ground.


This is what a cistern looks like when you don't fill it with water before you have a heavy downpour.


This is what a cistern looks like when you plant it a second time.


A minor setback, but a good reminder that you have to expect the unexpected. Our well pump was stolen shortly before this happened so we had no way to fill the tank. We also couldn't bury the cistern completely without water in it because the weight of the soil would collapse it. Just another minor Catch 22 to work around.

Prepping the Site

The pond begins!
We used the dirt from the pond to build the pad for the slab.
For the next few days, our site prep contractor is finishing the pond, burying our geo-thermal-conditioned air ducts, building the slab pads, installing utility stub-ups, and building the forms for the concrete slab on our 40' x 50' Quonset. The slab will be ready to pour in three days, so I'll have more exciting details and photos then.
It's amazing what this little guy can do!
Movin' dirt!


During this time, I'll fill you in on more details of our overall plan.

As I mentioned before, we purchased a 40' x 70' x 18' 'S-Series' Quonset. Normally, this structure would be erected intact, as designed and specified by the manufacturer. However, my natural tendency to tweak things a bit has taken over and we are building, what I can best describe as, a compound. Our compound will basically feature:
  •  a 40' x 50' garage which will contain our RV, car, and pick-up; laundry, bath, office, and workshop;
  • A 40' x 30' cabin with two bedrooms, two baths, living room, large pantry, and kitchen; (To get the extra ten feet of depth we ordered another five arches from Pioneer.)
  • Additionally, we will have a small pond stocked with talapia, lots of garden space, and room for whatever small livestock (chickens, geese, ducks, goats, etc.) we eventually may add to the mix.
There are other features in the plan, but I'll fill you in on those as we progress.

We are starting with the garage. Once it is up and we have utilities connected, we can move onto the property and live in our RV while we work on the rest of the project.

    Friday, July 8, 2011

    For some of you, this is where it gets interesting

    There are a few wrinkles in this story that may start some juices flowing for those techno-geeks among you looking for self-sustaining synergy that can only be found in a Quonset hut. We plan to bring home construction to a whole new level by making certain features, unique to Quonset huts, produce multiple benefits:
    • Benefit #1: Free Air Conditioning & Heating - using the unique corrugations in the galvanized skin of our Quonset, we will circulate heated and cooled air throughout the building using only the power of the sun's heat. 
    • Benefit #2: Free Hot Water - Solar heated water is not new, but it's never been cheaper or easier. 
    • Benefit #3: Free Electricity - Photovoltaic-charged battery systems without the high cost of expensive PV panels. 
    • Benefit #4: Free Water -The Quonset hut's skin design makes it ideal for collecting and directing rain water, and even dew, to your cistern or reservoir.
    • Benefit #5: Free Groceries - Okay, maybe that's going a little too far. But we do plan to surround our home with permaculture gardens, so maybe there will be some 'free' groceries.
    Our goal is to be off-grid as much as possible without sacrificing basic comforts in our quest for a passive life-support system.